If you're interested in running Mac OS X, but you don't want to pay ridiculous prices for a normal Mac, then a Hackintosh just might be for you. Right now, the newest iteration of OS X is 10.8, known as Mountain Lion. In this guide, we'll show you how to install Mountain Lion on your PC with the newly released "Niresh" distro.
We've previously covered how to install Mountain Lion on a PC using tonymacx86's Unibeast tool, which requires you to have an existing Mac OS X installation. This usually means that you have to install Snow Leopard on your PC first, or find a real Mac. We've also covered how to install Mountain Lion on a PC using a "distro" like iAtkos, which allows you to jump straight to Mountain Lion. However, you can't set up iAtkos on a regular DVD, and iAtkos doesn't work with AMD or Atom processors. If you find either of these limitations to be inconvenient, then using the Niresh distro instead may be your best option.
The difference between Niresh and iAtkos

Distros are pirated copies of Mac OS X that have been modified to work with a PC. If you don't have any qualms with the legal issues regarding distros, they're actually the most convenient way to set up a Hackintosh. If you're interested in installing Mac OS X on your PC with a distro, then you'll have two main options: Niresh, and iAtkos ML2. iAtkos is the far more popular choice of the two. However, there are a few reasons why you may want to use Niresh instead.
On the other hand, iAtkos offers a few key advantages over Niresh. Most notably, iAtkos includes built-in support for installation on RAID volumes and MBR partitions.
Requirements:
1. Create your Niresh DVD
Burn Niresh onto a DVD disc. You will be booting your Hackintosh from this Niresh DVD, in order to install OS X Mountain Lion. On Mac OS X, burning capabilities are built-in to the operating system-- just insert an empty DVD into your DVD/Bluray drive, right-click on the downloaded Niresh file, and burn it.
 However, if you're using Windows, you will need to use a program such as ImgBurn. While Windows 7 and 8 include built-in DVD burning software, in my personal experience, ImgBurn tends to be far more reliable.
DOWNLOAD: ImgBurn
Depending on the speed of your DVD burner, this can take up to few hours. Wait until the DVD has been successfully burned, and then proceed to the next step.
2. Set up the parts of your PC
I covered these steps in my Snow Leopard guide, but they're worth mentioning again:
3. Set up your motherboard's BIOS
The BIOS is basically a settings page for your motherboard. To enter the BIOS on my own computer's Gigabyte P67A-D3-B3 motherboard, I have to press the delete key when it boots (before the operating system starts). Different manufacturers set different keys for opening the BIOS.
NOTE: If you have a newer Gigabyte motherboard that uses the UEFI interface instead of BIOS, check out our guide for setting up the UEFI instead.
 If your Hackintosh already has Mac OS X Snow Leopard or Lion installed, the only thing you'll need to change in the BIOS is the "Boot Device", so that your Niresh DVD has highest priority.
If your Hackintosh doesn't have Snow Leopard or Lion installed yet, you have to change a few extra BIOS settings. Before starting, reset all of your BIOS settings to their factory defaults. On Gigabyte motherboards, you can reset your BIOS settings to their default by selecting "Load Optimized Defaults" on the main page of the BIOS. Once your BIOS is running on its defaults, you need to change these three settings:
Boot Device - Change the boot device of your computer so that "CDROM" is first. You need to do this for Niresh to work. After you finish installing Mac OS X, you should change this setting back to default, so that "Hard Disk" is the first boot device (this optional, but it will speed up your boot times).
 HPET - Change this to 64-bit.
 SATA Control Mode (your BIOS might call this a different name) - This will probably already be set to "SATA", "IDE", or "RAID". Change it to "AHCI". Mac OS X only works with AHCI.
 Keep in mind that the BIOS on most motherboards do not support using a mouse, so you'll probably have to navigate through the BIOS with the arrow keys on your keyboard. Press "Enter" to change a selected option in the BIOS. On my Gigabyte motherboard, I have to press F10 to save my changes.
4. Boot into Niresh
Insert your Niresh DVD into your computer's DVD drive, and restart your computer. If things go well, your computer will boot into Niresh instead of booting from your normal hard disk. You will then be able to view the black-and-white Niresh menu.
 If you do not manage to reach the Niresh menu, check your motherboard's BIOS settings to make sure that the changes you made in Step 3 were properly applied. If they were, but you still cannot boot from Niresh, go back to Step 1 of this guide and try again with a DVD (preferably using ImgBurn).
At the Niresh menu, press the enter key (or return key) to start the OS X Mountain Lion installer. If you are trying to install OS X Mountain Lion on a computer using an AMD or Intel Atom processor, you'll have to type the boot flag "amd" (without quotation marks-- for AMD) or "atom" (without quotation marks-- for Atom).
 In the worst case scenarios, instead of loading the Mac OS X installer, you may end up at a dark gray screen that tells you to restart your computer (a kernel panic), or you may end up with a small crossed-out sign (a loading error). If you get a kernel panic/loading error (or if the Mac OS X installer simply won't start within 10 minutes), you'll need to enter some boot flags. To enter boot flags, manually restart your computer by pressing your computer's power button. Then, once you've booted back into the Niresh menu, try typing any necessary boot flags before pressing the enter/return key. Check out this list of common boot flags for reference ( PCIRootUID=0 and -x are two popular boot flags).
 If you're installing Mountain Lion on a computer that has never been turned into a Hackintosh before (i.e. doesn't already have Snow Leopard or Lion installed), the hard drive selection box will be blank. We'll have to fix that. To do this, start up Disk Utility, which is located under the Utilities menu in the top bar.
You need to use Disk Utility to erase a hard drive partition so that OS X Mountain Lion can install itself on it. In the sidebar of Disk Utility, choose the hard drive where you want Mountain Lion installed, and erase it by using the "Erase" tab. In the screenshot below, my hard drive is called "21.47 GB VBOX HARDDRIVE".
 When erasing, the format should be set to "Mac OS Extended (Journaled)". You can also partition the hard disk by using Disk Utility's Partition tab. Mac OS X cannot boot from a partition that's larger than 1 TB in size, so if you have a 2 TB hard drive, you will have to partition it.
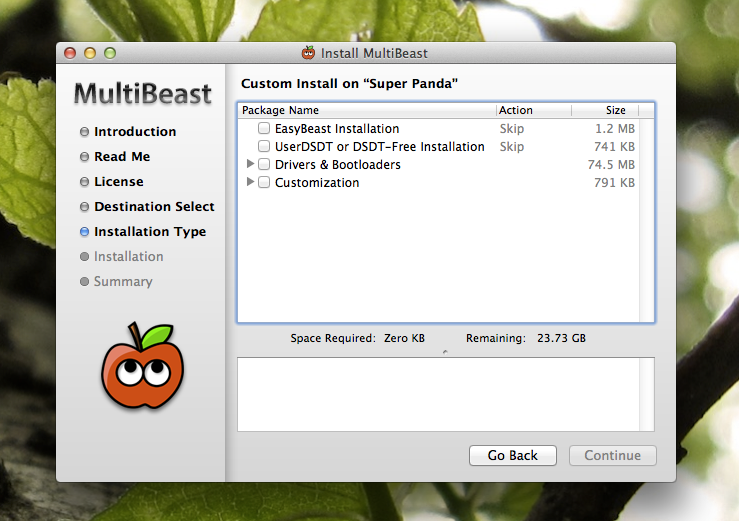
 However, choosing the right options from this page can be really tricky, so unless you're absolutely certain about which drivers and kexts you need to install for your computer, I don't recommend installing too much stuff from here. The default selection will enable Mac OS X to boot from the hard drive without any assistance. For most computers, that will be enough (at least for the initial installation). If you wish to install more, refer to our guide to Multibeast. Otherwise, you can figure out the rest in Step 6, where you'll actually set up your Hackintosh with Multibeast.
After you're done with the "Customize" page, install Mountain Lion. This will take at least 30 minutes.
 Once the installation finishes, remove your Niresh DVD, and restart. At the boot screen, you'll see an icon for the hard drive where you installed Mountain Lion. Select it (use the arrow keys on your computer) and press "Enter". Mountain Lion will boot. Mission accomplished!
 Once again, if you get a kernel panic/loading error when you try to boot your new Mountain Lion installation (or if the installation simply won't start within 10 minutes), you'll need to enter some boot flags. To enter boot flags, manually restart your computer by pressing your computer's power button. Then, once you've booted back into the Niresh menu, try type any necessary boot flags before pressing the enter/return key. Check out this list of common boot flags for reference ( PCIRootUID=0 and -x are two popular boot flags).
Another common issue with Niresh is that it tends to lag out of the account creation process, and skip straight to the Mac OS X login screen before you can make your own account. If this happens, simply log into Mac OS X with the following credentials:
Username: root
Password: niresh
This will log you into the "root" account of Mac OS X. From here, open the System Preferences app, go to "Users & Groups", and create your own account. (We don't recommend that you use the root account permanently, because it is insecure.)
6. Multibeast
Multibeast is a collection of kext files that you'll need to install for your Hackintoshes to have sound, internet, a high resolution screen, and more. Different Hackintosh builds require different Multibeast setups, though most setups are very similar. Find out what Multibeast options you need to install. If you have a Gigabyte GA-P67A-D3-B3 motherboard like me, check out my own Multibeast setup.
 If you're just updating your Hackintosh from Mac OS X Lion, you don't have to reinstall UserDSDT, Easybeast, or Chimera in Multibeast after installing OS X Mountain Lion. Mac OS X treats Mountain Lion as just another update-- this generally means that the only things you have to reinstall in Multibeast are audio kexts and ethernet kexts. You might also have to reinstall miscellaneous kexts, such as TRIM Enabler (for SSDs).
To run Multibeast in OS X Mountain Lion, you have to go the "Security" section of System Preferences in Mac OS X, go to the "General" section, and check "Anywhere" in the "Allow applications" section. After running Multibeast, you'll also probably want to change your BIOS settings back to normal (from Step 3).
Once that's done with, you should be running a fully functional copy of OS X Mountain Lion on your PC. If you plan on updating Mac OS X in the future, check out our guide to updating your Hackintosh. Congratulations!
We've previously covered how to install Mountain Lion on a PC using tonymacx86's Unibeast tool, which requires you to have an existing Mac OS X installation. This usually means that you have to install Snow Leopard on your PC first, or find a real Mac. We've also covered how to install Mountain Lion on a PC using a "distro" like iAtkos, which allows you to jump straight to Mountain Lion. However, you can't set up iAtkos on a regular DVD, and iAtkos doesn't work with AMD or Atom processors. If you find either of these limitations to be inconvenient, then using the Niresh distro instead may be your best option.
The difference between Niresh and iAtkos
Distros are pirated copies of Mac OS X that have been modified to work with a PC. If you don't have any qualms with the legal issues regarding distros, they're actually the most convenient way to set up a Hackintosh. If you're interested in installing Mac OS X on your PC with a distro, then you'll have two main options: Niresh, and iAtkos ML2. iAtkos is the far more popular choice of the two. However, there are a few reasons why you may want to use Niresh instead.
- Niresh works with regular DVDs. iAtkos only works with the less common (and more expensive) dual-layer DVDs and Bluray discs, because the iAtkos installer is slightly too large to fit on a regular DVDs.
- Niresh is distributed as an "ISO" file. The ISO format is a standard DVD image format that works on just about everything. Meanwhile, iAtkos is distributed as a "DMG" file, which is a proprietary "disk image" format made by Apple. DMG files are rather difficult to work with, since they don't work with Windows by default. To set up iAtkos on Windows, you have to use special software like Transmac.
- Niresh supports AMD and Intel Atom. Normally, computers that use AMD or Intel Atom processors are unsupported by Mac OS X. However, Niresh includes experimental "patched" kernels that may allow Mac OS X to work with these processors regardless.
On the other hand, iAtkos offers a few key advantages over Niresh. Most notably, iAtkos includes built-in support for installation on RAID volumes and MBR partitions.
Requirements:
- An existing Windows computer/Mac/Hackintosh: This is the computer where you will download and set up Niresh. Either Windows or Mac OS X will work. Make sure your computer has a DVD/Bluray burner (just about every DVD/Bluray drive nowadays can act as a burner, too).
- A Hackintosh-compatible computer with an empty hard drive: This is the computer where you will install OS X Mountain Lion. It can be the same computer as the one mentioned in the previous point. If your computer already has Mac OS X Lion installed, Niresh will just update Lion to Mountain Lion normally, without deleting any of your apps or files.
However, not every computer will work with Mac OS X. Be sure to read the Hackintosh compatibility guide very carefully, to check whether or not your computer qualifies. Also, Mac OS X needs its own hard drive-- a minimum of 10 GB of space is required, but at least 50 GB of space is recommended. As far as we know, Niresh will not work on a hard drive where Windows is already installed. - Niresh 10.8.2 (Free): Niresh is a "distro" of OS X Mountain Lion that has been modified to work with PCs. You will need to use a bittorrent client to download the file, which is a little less than 5 GB in size.
- A DVD: In this guide, you will write Niresh onto a DVD, and boot your computer from Niresh to install Mac OS X. Any empty DVD will work.
- Multibeast (Free): Multibeast is a collection of kext files that your Hackintosh will need to run properly, after the initial installation. Be sure to download the newest version 5 of Multibeast, not the older versions 3 or 4 (which are for Snow Leopard and Lion, respectively).
1. Create your Niresh DVD
Burn Niresh onto a DVD disc. You will be booting your Hackintosh from this Niresh DVD, in order to install OS X Mountain Lion. On Mac OS X, burning capabilities are built-in to the operating system-- just insert an empty DVD into your DVD/Bluray drive, right-click on the downloaded Niresh file, and burn it.
DOWNLOAD: ImgBurn
Depending on the speed of your DVD burner, this can take up to few hours. Wait until the DVD has been successfully burned, and then proceed to the next step.
2. Set up the parts of your PC
I covered these steps in my Snow Leopard guide, but they're worth mentioning again:
- Unplug all USB-connected devices from your computer before you begin the setup (except your keyboard and mouse). A faulty external USB hard drive can cause your Hackintosh bootloader to give you EBIOS errors on startup.
- Open up your computer and unplug any extra internal hard drives that your computer has, besides the hard drive that you're installing OS X on. (Just unplug the hard drive SATA cables from your motherboard.)
- If possible, connect your monitor to the DVI port of your computer's graphics. The Mac OS X installer sometimes has problems with HDMI and VGA.
NOTE: If you're installing Mac OS X on a computer that already has Windows installed, you may have to enable AHCI for Windows beforehand. Otherwise, Windows won't boot afterwards. Also, after installing Mac OS X, you should also sync your clock on Windows with Mac OS X.
3. Set up your motherboard's BIOS
The BIOS is basically a settings page for your motherboard. To enter the BIOS on my own computer's Gigabyte P67A-D3-B3 motherboard, I have to press the delete key when it boots (before the operating system starts). Different manufacturers set different keys for opening the BIOS.
NOTE: If you have a newer Gigabyte motherboard that uses the UEFI interface instead of BIOS, check out our guide for setting up the UEFI instead.

Boot Device - Change the boot device of your computer so that "CDROM" is first. You need to do this for Niresh to work. After you finish installing Mac OS X, you should change this setting back to default, so that "Hard Disk" is the first boot device (this optional, but it will speed up your boot times).


4. Boot into Niresh
Insert your Niresh DVD into your computer's DVD drive, and restart your computer. If things go well, your computer will boot into Niresh instead of booting from your normal hard disk. You will then be able to view the black-and-white Niresh menu.

At the Niresh menu, press the enter key (or return key) to start the OS X Mountain Lion installer. If you are trying to install OS X Mountain Lion on a computer using an AMD or Intel Atom processor, you'll have to type the boot flag "amd" (without quotation marks-- for AMD) or "atom" (without quotation marks-- for Atom).

5. Install Mountain Lion
Once you've entered the OS X Mountain Lion installer, you will come up to a page that asks you for a "destination" for your Mountain Lion installation.


After you're done with the "Customize" page, install Mountain Lion. This will take at least 30 minutes.


Another common issue with Niresh is that it tends to lag out of the account creation process, and skip straight to the Mac OS X login screen before you can make your own account. If this happens, simply log into Mac OS X with the following credentials:
Username: root
Password: niresh
This will log you into the "root" account of Mac OS X. From here, open the System Preferences app, go to "Users & Groups", and create your own account. (We don't recommend that you use the root account permanently, because it is insecure.)
6. Multibeast
Multibeast is a collection of kext files that you'll need to install for your Hackintoshes to have sound, internet, a high resolution screen, and more. Different Hackintosh builds require different Multibeast setups, though most setups are very similar. Find out what Multibeast options you need to install. If you have a Gigabyte GA-P67A-D3-B3 motherboard like me, check out my own Multibeast setup.
Once that's done with, you should be running a fully functional copy of OS X Mountain Lion on your PC. If you plan on updating Mac OS X in the future, check out our guide to updating your Hackintosh. Congratulations!
 Installing WordPress locally gives you a fantastic test environment. You can install as many WordPress as you want on your computer. On mine I’ve got:
 Click on the installer.


 Here is what you need to update the settings to:


 To catch the attention of your readers


